SOTA Activation Report: W4G/NG-004, Blood Mountain

Trip of 2013.06.15

  • Succeeded: Yes
  • First-activation: No
  • Propagation forecast on departure:
    • 20m-40m good; 6m skip open
  • Propagation forecast on return:
    • 20m-40m good; 6m skip closed

See my trip planning guide at: SOTA Guide: W4G/NG-004, SummitName

Commentary: Today I snatched victory from the jaws of defeat. After calling CQ for 25 minutes on HF from the summit of Blood Mountain, I’d raised only 3 contacts. I was thinking about moving my setup 20 yards and trying again, just in case I was getting a strange pattern and then throwing in the towel.

Then I threw a “Hail Mary.” I’ve never been able to raise anyone on VHF, but I carry an HT for APRS. (Really never – as in ‘zero contacts.’) I know that one doesn’t call CQ on VHF, so I went to 146.52 and used that classic call, “K4KPK. Hello? Can anyone hear me?” I immediately heard from 2 hams and a short time later a 3rd.

Then I went back to HF, pulled down my vertical and strung my EFHW through the trees at about 6’ and picked up 3 more contacts on 20m.

As I was setting up, a young man (early teens) came up to observe. (His dad was discreetly observing from about 20’ away.) As I was re-doing my antenna, I had a lovely chat with KK4NVH, who recently received his Technician license through a class/club in his school.

Later, as I was packing up, a backpacker paused. Since Blood Mountain is a busy area, I’d already had several, “What’s that?” conversations with hikers today, so I assumed this would be another one. Then he called me by name. I’m 70 miles (and +3400’ altitude) from home, and I run into someone from work! And I’m a telecommuter, so I don’t even run into people from work when I’m at work!

After hiking back to the car and hurrying to Dahlonega, I make it to my favorite barbecue joint, “Smokin’ Gold,” 4 minutes before closing. I ask whether it is too late to get take out because I know they don’t want to seat me at 4 minutes to closing. They tell me to pick a table and to take my time eating.

So 10 points for the activation plus my favorite barbecue, and both of them were by the skin of my teeth. A Grand Day Out.

SOTA Activation Report: W4G/NG-005 Tray Mountain and W4G/NG-011 Rocky Mountain

Trip of 2013.05.31

  • Succeeded: Yes
  • First-activation: No

See my trip planning guide at: SOTA Guide - W4G/NG-005 Tray Mountain and W4G/NG-011 Rocky Mountain

Commentary: I activated Tray Mountain (W4G/NG-005) and Rocky Mountain (W4G/NG-011) on Friday, May 31.

Tray Mountain:

I parked in the Tray Gap parking area, where Tray Mountain Rd passes nearest to Tray Mountain, and where it meets Corbin Creek Rd. (There’s a gate at the entrance to Corbin Creek Rd – it was open.)

The morning was foggy with intermittent drizzle. I couldn’t see much from Tray. I set up with my KX3 and an AlexLoop almost on top of the benchmark. I had no trouble getting out SMS messages and APRS messages. (There was lots of APRS traffic.) I didn’t make any 40m contacts. I made only a few 20m contacts. The propagation forecast was “Good” for 80-20m. I don’t know whether actual propagation was poor, not many chasers were active, or my antenna wasn’t getting out.

The summit is mostly patches of granite with some dwarf trees and rhododendron. If you’re a fan of self-supporting antennas (such as the AlexLoop on a tripod), this is a good site to use them.

The route to Tray is easy – just follow the AT blazes. Tray Mountain is in the eponymously named Tray Mountain Wilderness. You’ll pass by a big sign enumerating Wilderness Area rules. No mention of any limits on amateur radio. ;-) It is not a particularly difficult hike.

As I returned to the parking area, a family drove up Corbin Creek Rd and parked. The family and their dog piled out for a day in the woods. As I was leaving, I saw them puzzling over a large map. That kinda puzzled me: The AT is clearly marked, it goes up to Tray Mountain and down to Indian Grave Gap; there’s no other trail in the gap.

Rocky Mountain:

I parked at Indian Grave Gap. The AT crossing is well marked and there’s a good sized parking area. There is a side trail to the Andrews Cove campground at Highway 17.

The walk up Rocky is longer than Tray, and it has many stone steps. It is hard on the knees coming down. There are some pretty views near the top. I might have missed the side trail to the summit, had my GPS not chimed that I’d arrived.

There’s a pretty (but dry) campsite on the summit. Plenty of space for guying an antenna and nice trees to hang a wire. There’s shaded grassy space near the fire circle and a pine straw covered tent pad.

Driving:

Tray Mountain Road was drivable in my Corolla. It wasn’t bad, but there are some erosion gullies and potholes which might be a problem if it degrades much more before maintenance happens. Indian Grave Gap Road is a little better shape, and it is definitely a shorter drive. The ford on Indian Grave Gap road wasn’t a problem, but there hadn’t been significant rainfall for several days. (Climbing out from the creek is a bit steep, so be sure not to come to a stop in mid-creek, so you’ll have some momentum.)

SOTA Activation Report: W4G/NG-035, Bell Knob

Trip of 2013.05.29

  • Succeeded: Yes
  • First-activation: No

See my trip planning guide at: SOTA Guide: W4G/NG-035, Bell Knob

Commentary: I activated Eagle Mountain (W4G/NG-008) and Bell Knob on May 29, 2013. Eagle is a long walk for me, at 4.7 miles. (4WD owners can do it in 4.4.) Much of the route is used as a horse trail; it is a little chewed up and muddy, even on a dry day. I was fortunate to be able to follow a GPX trace I got from the Atlanta Outdoor Club. There were some turns I might have missed otherwise.

I used a 31’ vertical with an EARCHI 6-40 matchbox, and a single 28’ counterpoise. I had success on 20m but couldn’t raise anyone on 40. The propagation forecast was good for 80-20 when I left home, and good for 40-20 when I got home.

Since the hike went faster than I expected, I hustled back to the car and drove over to Bell Knob. The road to the Bell Knob trailhead is loose dirt and gravel, and it becomes too steep for 2WD in dry weather. I drove as far as I could, and parked in some grass when the tires couldn’t get traction to go any farther.

I hiked up the road to the T, where a deeply rutted ATV trail heads off to the left. I followed the trail to the summit. There are twin points on top, and they look to be about the same height. They also look to be tall enough that the saddle between is not in the activation zone. I picked the second (slightly farther along the trail). Fortunately, this was the right one, as evidenced by the benchmark up top. I started to climb the rock face, but someone coming down showed me the ‘easy’ trail on the lake side. (It is a pretty aggressive trail, but much better than climbing the rubble on the front.)

I used an AlexLoop on Bell. Again, I had success on 20m but not 40. I did manage to work a weak contact into Germany. He was very patient when I asked him to repeat his call sign for about the 5th time.

There’s no scenic view from Eagle. Bell Knob has really nice views.

I shoulda stopped after Eagle. My feet were only tired then. On Bell Knob, I picked up some nasty blisters.

Thank you chasers!

  • Eagle:
    • N4EX
    • WA2USA
    • W0MNA
    • W0ERI
    • N1FJ
    • KB1RJC
    • KB1RJD
    • N0TU
  • Bell:
    • N1EU
    • W1DMH
    • K1MAZ
    • WB5USB
    • DJ5AV

SOTA Activation Report: W4G/NG-008, Eagle Mountain

Trip of 2013.05.29

  • Succeeded: Yes
  • First-activation: No

See my trip planning guide at: SOTA Guide: W4G/NG-008, Eagle Mountain and SOTA Guide: W4G/NG-035, Bell Knob

Commentary: I activated Eagle Mountain (W4G/NG-008) and Bell Knob on May 29, 2013. Eagle is a long walk for me, at 4.7 miles. (4WD owners can do it in 4.4.) Much of the route is used as a horse trail; it is a little chewed up and muddy, even on a dry day. I was fortunate to be able to follow a GPX trace I got from the Atlanta Outdoor Club. There were some turns I might have missed otherwise.

I used a 31’ vertical with an EARCHI 6-40 matchbox, and a single 28’ counterpoise. I had success on 20m but couldn’t raise anyone on 40. The propagation forecast was good for 80-20 when I left home, and good for 40-20 when I got home.

Since the hike went faster than I expected, I hustled back to the car and drove over to Bell Knob. The road to the Bell Knob trailhead is loose dirt and gravel, and it becomes too steep for 2WD in dry weather. I drove as far as I could, and parked in some grass when the tires couldn’t get traction to go any farther.

I hiked up the road to the T, where a deeply rutted ATV trail heads off to the left. I followed the trail to the summit. There are twin points on top, and they look to be about the same height. They also look to be tall enough that the saddle between is not in the activation zone. I picked the second (slightly farther along the trail). Fortunately, this was the right one, as evidenced by the benchmark up top. I started to climb the rock face, but someone coming down showed me the ‘easy’ trail on the lake side. (It is a pretty aggressive trail, but much better than climbing the rubble on the front.)

I used an AlexLoop on Bell. Again, I had success on 20m but not 40. I did manage to work a weak contact into Germany. He was very patient when I asked him to repeat his call sign for about the 5th time.

There’s no scenic view from Eagle. Bell Knob has really nice views.

I shoulda stopped after Eagle. My feet were only tired then. On Bell Knob, I picked up some nasty blisters.

Thank you chasers!

  • Eagle:
    • N4EX
    • WA2USA
    • W0MNA
    • W0ERI
    • N1FJ
    • KB1RJC
    • KB1RJD
    • N0TU
  • Bell:
    • N1EU
    • W1DMH
    • K1MAZ
    • WB5USB
    • DJ5AV

SOTA Activation Report: W4G/CE-001 Kennesaw Mountain All Frequency Expedition

Trip of 2013.05.12

  • Succeeded: Yes
  • First-activation: No

See my trip planning guide at: SOTA Guide: W4G/CE-001, Kennesaw Mountain

Commentary:

I hiked most of the way up from the visitor center with my youngest son. Then I realized that I forgot the iPhone and I’d left it sitting in plain view. We hiked back down to rescue it. Then we took the shuttle to the upper parking lot.

I used an AlexLoop for the first time. I tried 40m, 20m, 17m, 15m, 12m, and 10m. I had success on 20m, limited success on 15m and 17m, and a single very weak contact on 12m.

Whenever a tourist would come along and look like he/she might interrupt me, I shout, “Tour guide!” and my 9 year-old son would put down his book, hop up and give a little lecture on SOTA and the finer points of the ionosphere. He has a big vocabulary for a kid his age. It was fun watching people react.


SOTA - Avoid Contests

Big ham contests can interfere with the SOTA activation experience. There’s a contest somewhere, just about every weekend, so the best you can do is to avoid the really BIG ones. If you must activate on a contest weekend, CW and SSB all run on different weekends - use the mode not in play for the contest that weekend or head to the WARC bands.

When you set a date for your activation:

  • Check the ARRL contest calendar. (Check “Contest Corral” at the bottom of the page to get non-ARRL contests)
  • OR check http://www.hornucopia.com/contestcal/perpetualcal.php
  • The big weekends to avoid are:
    • Phone (SSB and other modes)
      • March
        • 1st full weekend in March (All Sat+Sun UTC) - ARRL DX (Phone)
        • Last weekend in March (All Sat+Sun UTC) - CQ WPX (Phone). Very big. I found no clear frequencies on 17/20/40 in 2015 at 5 PM.
      • June
        • 4th full weekend in June (1800 Sat to 2100 Sun UTC = 2 PM Sat to 5 PM Sun EDT ) - Field Day
      • July
        • 2nd full weekend in July (1200 Sat to 1200 Sun UTC = 8 AM Sat to 8 AM Sun EDT ) - IARU Radio Sport
      • October
        • 4th or 5th weekend in October - CQWW - http://www.cqww.com/
      • November
        • 3rd full weekend in November (2100 Sat to 0300 Mon UTC = 4 PM Sat to 10 PM Sun) - Sweepstakes
    • CW
      • February
        • 3rd full weekend in February (All Sat+Sun UTC) - ARRL DX (CW)
      • May
        • Last weekend in May (All Sat+Sun UTC) - CQ WPX (CW)
      • June
        • 4th full weekend in June (1800 Sat to 2100 Sun UTC = 2 PM Sat to 5 PM Sun EDT ) - Field Day
      • October
        • 4th or 5th weekend in October - CQWW - http://www.cqww.com/
      • November
        • 1st full weekend in November (2100 Sat to 0300 Mon UTC = 4 PM Sat to 10 PM Sun EST ) - Sweepstakes

Notes on APRS, KISS, and Setting Up a TNC-X iGate and Digipeater

Suppose you’ve connected your HT to a KISS TNC and your TNC is connected to your computer, and everything is powered on. How do you tell whether it is working? Or, put another way, how do you debug it, from the bottom up?

I’m going to assume that you have a source of APRS radio packets. In other words, I assume that there is someone near you who is sending APRS traffic frequently or that you have a second radio which is sending APRS traffic. In my case, I have a cheap HT connected to my TNC and I have another HT which is capable of sending APRS beacons, so my APRS HT is my source of traffic. Unless I state otherwise, “HT” in the material below will refer to the HT that is connected to the TNC.

  • Is your HT receiving traffic?
    • Check to see that your HT indicates that it is receiving traffic every now and then. This is typically indicated by a Receive LED on the HT, or you can temporarily unplug the audio connection to your TNC and see whether you hear modem-screech every now and then. If it isn’t happening, check to be sure that there really is APRS traffic to be heard, check that you are on the right frequency, check your squelch, and check that your volume is set to mid-level.
  • Is your TNC receiving traffic?
    • Check to see that your HT indicates that it is receiving traffic every now and then. This is typically indicated by a Receive LED on the TNC. If it isn’t happening, check the cable from your HT and try different volume levels on your HT
  • Is your computer receiving traffic?
    • Start up a terminal program. (If your TNC is connected to your USB port, then you must load a driver that makes your USB port act like a serial port. TNCs must appear to the computer as a serial port device, even if it is a virtual serial port.) Every time the HT receives, you should see a string of characters/symbols on your terminal screen. If not, fiddle with the volume on your HT and try and improve your radio signal (by fiddling with your antenna).
    • Using a terminal program (or similar program) that can capture data from your serial port, capture the data to a file. Then dump the file in hex. Proceed to the next section of this guide.

Making Sense of Received Data

  • The computer and TNC exchanged data frames using “asynchronous packet protocol”
    • Frames begin and end with a FEND/Frame End/0xC0 byte
    • 8 data bits, one stop bit, no parity
    • All bytes are data except:
      • 0xC0 marks start and end of a frame
      • 0xDB 0xDC = data byte 0xC0
      • 0xDB 0xDD = data byte 0xDB
    • Details of the special bytes:
      • Frames begin and end with a FEND/Frame End/0xC0 byte
      • FESC/Frame Escape/0xDB - escapes FEND and FESC bytes within a frame
        • But the FEND or FESC after a FESC isn’t the normal version. They are TFEND/Transposed FEND/0xDC and TFESC/Transposed FESC/0xDD
      • So FEND only appears at the beginning and end of a frame. When you need a FEND in your data, you send FESC followed by a TFEND.
      • So FESC only serves as an escape character. When you need a FESC in your data, you send FESC followed by TFESC.
    • This is similar to TCI/IP’s SLIP (Serial Line Interface Protocol), but not identical.
  • Within data frames (which have been un-escaped – i.e. escaped data has been converted to pure data and FENDs have been removed):
    • First byte = Type Byte
      • Two nibbles processed separately
        • Low-order nibble = Command
        • High-order nibble = Port Number
      • 0x00 = “Send the rest of this frame over the radio as-is”

So the next thing to do is to take a look at the hex dump of your received data. Find each hex C0. If you find two C0 bytes back-to-back, you received more than one frame. For purposes of this discussion, I’ll assume that you either received only a single frame, or that you ignore everything after the first frame.

  • First sanity check on your data – Do you have a C0, followed by some bytes that aren’t C0, followed by a C0?
    • Yes? Good! It looks like your TNC is speaking KISS.
    • No? Maybe your TNC can speak multiple protocols. RTFM and find out how to put it into KISS mode. If it only speaks KISS, then you should look at what baud rate, parity bits, stop bits it is set to use. “1200 baud, 8 data bits, 1 stop bit, no parity bits, no flow-control” is common. Try setting both your TNC and your serial port to these settings.
  • If you are past the C0 sanity check, de-KISS your data and proceed to the next section.
    • “De-KISS” means to remove the C0 bytes, and to decode any FESC secquences, so that your captured data reflects only pure data.

This is a sample frame I received: C00088888CA868AE60966896A09640EEAE92888A624062AE92888A64406303F060702F686C211E5B2F6022366F7D5F230DC0

and this is the same frame, de-KISSed: 0088888CA868AE60966896A09640EEAE92888A624062AE92888A64406303F060702F686C211E5B2F6022366F7D5F230D

Checking the De-KISSed Data

I haven’t figured out 100% of the data yet, but here’s a start.

  • Starting with the first byte of data, look at whether the byte is an even or odd number. Find the first odd byte. It should be somewhere after the 8th byte.
  • Take each byte, starting with the first byte, proceeding through the first odd byte, and divide the value by two. (You’re shifting all of its bits on position to the right.)
    • Here is my sample frame, truncated at the first odd byte: 0088888CA868AE60966896A09640EEAE92888A624062AE92888A644063
    • Here is my sample frame, with each byte divided by two: 00444446543457304B344b504b20775749444531203157494445322031
    • This sequence is your address field.
  • Convert the divided-by-two bytes from hex to ASCII (using an ASCII chart). I’ll show the divided-by-two bytes on one row, and the translated to ASCII on the next row:
    • 00444446543457304B344b504b20775749444531203157494445322031
    • ` _ D D F T 4 9 0 K 4 K P K _ w W I D E 1 _ 1 W I D E 2 _ 1`
    • My source address was K4KPK-7 and my destination address was WIDE1-1,WIDE2-1.
    • The space after K4KPK, WIDE1, and WIDE2 is padding the call sign to the maximum 6 bytes.
    • The hex 77 after K4KPK [space] has two nibbles. The first nibble is my SSID, and my SSID was indeed 7.

This is as far as I’ve gotten in understanding the AX.25 protocol, but it is good enough to convince me that I’m getting valid data from the HT into the TNC and from the TNC into the PC.


At this point, I started trying APRS iGate software. Here’s a brief summary:

  • aprx ** Installed it on Ubuntu. Since I run 64-bit ubuntu and aprx .deb is 32-bit, I had to install the 32-bit libraries. ** It installed and configured pretty easily as an RF-to-iGate gateway. ** Not all of my packets that are received by aprx are getting sent to APRS-IS. ** Some of my beacons ARE getting sent, but not of them show up on the map. ** It logs received frames nicely, but it is not logging what it sends to APRS-IS. ** To DISABLE it: sudo update-rc.d -f aprx remove ** To ENABLE it: sudo update-rc.d aprx defaults 84

APRS Notes for Smart People (not Dummies)

(I couldn’t call this page, “APRS Notes for Dummies,” because someone else owns the “for Dummies” trademark.)

North American APRS Frequency

  • 144.390 MHz
  • 445.925 MHz (maybe, in some places)

What SSID should I use? (SSID is the number that follows your call sign. e.g. K4KPK-1.)

  • Fixed home station: 0 (same as no SSID)
  • Cell phone pseudo APRS: 5
  • HT: 7
  • Mobile in a car: 9

What path should I use? I use my HT for SOTA. I use my cell phone in the car, generally in the city. I don’t turn on my HT until I hit the trail. Therefore, my HT gets used where coverage is sparse and my cell gets used where coverage is dense.

  • On cell phone: WIDE1-1,WIDE2-1
  • On HT: WIDE1-1,WIDE2-2
  • On fixed station: Find out the real node name of the nearest (always-on) node. Use that.

Beacon Rate

  • On cell phone (in the car - on car power): 2 minutes.
  • On HT (hiking - need to save battery): 7 minutes

These are twice the actual rate I’d like to beacon because I assume that only alternate beacons will get received.

APRS Messages

  • When you send a message, the recipient will send an ACK or a REJ. Since your message and the ACK/REJ are both best-effort delivery (like a TCP/IP network UDP message), either one might be lost if you don’t get the ACK.

How to Test for Internet Access

  • Message to WHO-IS, content = W1AW
    • Or to WHO-15 if you pass through a stupid iGate.
    • If you get data about W1AW, you reached the Internet.

How Can My XYL See My Location On a Map?

Send Email

  • To: EMAIL
  • Content: First string in message text is email address followed by a space, then your message.
  • Total length (including address) = 64 characters.

Create/Manage Email Alias

  • To: EMAIL-2
  • To create a shortcut: *Content: aliasName space emailAddress *e.g. Content: me k4kpk@example.com
  • To send email to the ‘me’ alias:
    • Content: me This is a test.
  • Ask for a list of all my shortcuts by sending:
    • Content: me L
    • This will cause an email to be sent to k4kpk.com@example.com with all of my shortcuts. The L is case-insensitive.
    • ???? OK. If I define an alias to someone@example.com, how can I get that alias sent to my email address? I think the form is:
      • Content: destinationAlias space command
      • So if I’ve defined xyl as an alias for wife@example.com:
        • Content: me L sends the full list of addresses to k4kpk@example.com and Content: xyl L sends the list of aliases to wife@example.com.
      • I wonder what would happen with Content: k4kpk@example.com L
  • To remove the “me” shortcut, I would send
    • Content: me r

Special Characters

  • To send special characters, such as the @ (“at sign”), tap 1, then rotate until you get to the character you want.

15V Power Wand for KX3

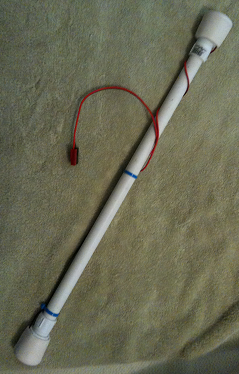
I wanted a 15V battery pack for my Elecraft KX3, made with NiMh AA batteries. To get 15V, I needed 11 NiMh cells. There are very few sources of 12 cell AA battery holders. For a while, I’ve used two 6-cell holders with 11 AA cells and one dummy cell. I thought it would be interesting to make an 11 cell battery holder…


This isn’t exactly how I did it, but it is how I would do it, if I were to do it again.

Ingredients:

  • 19-1/4” length section of 1/2” schedule 40 PVC pipe. 1 @ $2 (I had this sitting around the house, so I just estimated its price.)
  • 3/4”x1/2” PVC male adapter. This fits over the outside of 1/2” pipe, giving it 3/4” male threads. 2 @ $0.66 each
  • 3/4” PVC screw cap. 2 @ $1.26 each
  • #6-32 machine screw, 1/2” long, with nut, plus 2 extra nuts. From one package with several screws. $1.18 for the pack.
  • One negative terminal spring, removed from a AA battery holder. Be sure to grab one that has a small circle inside the big end. These things are sorta cone shaped. If you find the right one, it will be riveted inside the large end, and and there will be a small circle of wire inside the large end, with a rivet through it. You just have to drill out the rivet. $2
  • 2 ring terminals, sized to fit #6 machine screw, from supplies. $0.10
  • 2’ red/black zip line, 18 gauge, from supplies. $0.30.
  • 1 pair of PowerPole connectors, from supplies. $1.25.
  • 1 pair of 1-1/4” rubber chair leg tips. $2.79.

Instructions:

  1. Press the PVC male adapters onto the end of the pipe. You’re supposed to glue this stuff. I found that tapping them on with a mallet puts them on solidly enough to hold. (I wouldn’t do this with pressurized pipe, but the fit pretty snug. You can glue them if you wish.)
  2. Drill a hole in the center of the screw caps, sized so that the #6 machine screws screw into it tightly.
  3. Screw one #6 machine screw through the cap, with the screw head inside and the screw end outside the cap.
  4. Screw the other #6 machine screw through the small circle inside the large end of the battery spring, then through the other cap, from the inside to the outside.
  5. At this point, you have two caps with the ends of the machine screws sticking out. Screw one nut onto each. Tighten the nut securely.
  6. Solder a pair of ring terminals onto one end of the zip wire.
  7. Crimp PowerPole connectors onto the other end of the zip wire.
  8. Fasten the ring terminals onto the machine screws, using another nut for each machine screw. Use a washer too, if you like.
  9. Screw on the cap with the spring.
  10. Insert your batteries,
  11. Screw on the cap without the spring.
  12. Push the leg tips over the caps, to cover the screw ends.
  13. Bask in the glory of a job well done.

Update (2017): I replaced the chair leg tips with large diameter heat-shrink tubing. Tubing weighs less than the chair tips.


It is a little on the heavy side. For comparison:

  • My existing 12-cell holder: 16 ounces
  • My LiFePO4 battery pack: 12 ounces
  • Power wand (without the chair leg tips): 16 ounces